1.检查是使用了宝塔。
2.检查是不是伪静态故障。
解决方案:重新导入伪静态规则,重启IIS。一般来说都是伪静态的问题。昨天杰奇莫名其妙的就404了,最后检查发现,宝塔面板把伪静态给弄掉了。
1.检查是使用了宝塔。
2.检查是不是伪静态故障。
解决方案:重新导入伪静态规则,重启IIS。一般来说都是伪静态的问题。昨天杰奇莫名其妙的就404了,最后检查发现,宝塔面板把伪静态给弄掉了。
Warning: require(d:/wwwroot/******/configs/article/sort.php) [function.require]: failed to open stream: Permission denied in D:\wwwroot\****\index.php on line 5
Fatal error: require() [function.require]: Failed opening required 'd:/wwwroot/llove.tw/configs/article/sort.php' (include_path='.;C:\php5\pear') in D:\wwwroot\****\index.php on line 5
解决方案:主站给分站添加读写权限即可。IIS
Logy插件是最近在后台看见的一款非常棒的自适应插件。国内基本找不到免费的又如此棒的登陆插件。
Logy是一个安全的高级登录/注册/重置密码系统,具有优雅的响应式设计和许多强大的功能,如社交登录,限制登录尝试,Captcha等...极其可定制和一系列其他功能由KaineLabs提供。
更多详情wordpress插件后台搜索 Logy – The New Era Of Login 就不一一展示截图了
现在小学生,脚本小子太多了。人手一个扫描器防不胜防,安装完系统建议立即更换默认
本教程基于CentOS
使用sed命令,向ssh的配置文件追加指定SSH端口为35600
说明:一般情况下,ssh配置文件路径和内容是不会变动的,除非人为修改,所以可以直接指定Port ****
sed -i -e '1i Port 35600' /etc/ssh/sshd_config#临时关闭SELinux
setenforce 0
#CentOS 6
service sshd restart
#CentOS 7
systemctl restart sshdnetstat -ntlp | grep sshd
百度网盘没有官方的Linux客户端,有时候想中转文件很不方便,于是就有大神做了Go语言版的百度网盘,支持Windows, macOS, linux等系统
项目地址: https://github.com/iikira/BaiduPCS-Go
本文主要记录 CentOS 7 64bit 下,BaiduPCS-Go(以下简称BaiduPCS)的安装部署及简单使用
各个版本对应的客户端发布页:https://github.com/iikira/BaiduPCS-Go/releases
这里以最新的3.5.5版本为例
yum install wget unzip -y
wget https://github.com/iikira/BaiduPCS-Go/releases/download/v3.5.5/BaiduPCS-Go-v3.5.5-linux-amd64.zip
unzip BaiduPCS-Go-v3.5.5-linux-amd64.zip
cp BaiduPCS-Go-v3.5.5-linux-amd64/BaiduPCS-Go /usr/bin/BaiduPCS-Go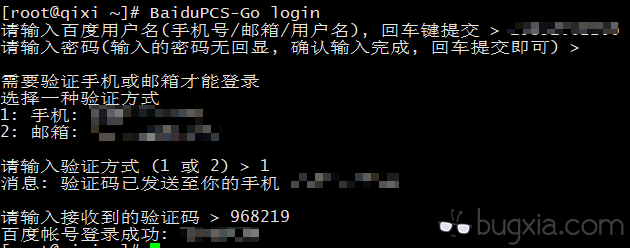
chmod 755 /usr/bin/BaiduPCS-GoBaiduPCS-Go login
#BaiduPCS-Go config set -savedir 保存文件的路径
#如:
BaiduPCS-Go config set -savedir /root/BaiduPCS_Download
#BaiduPCS-Go download 百度网盘内的文件路径
#如:
BaiduPCS-Go download /小米电视刷机包/MiTV2-49-r1.1.25.710-20140625.zip

#BaiduPCS-Go upload 本机文件路径 百度网盘路径
#如:
BaiduPCS-Go upload /root/test_up /上传测试

哈哈哈, [嘻嘻] 是可以让你很快乐的版本哦。
是自用的版本哦,这个我用了很多年了。
自行查杀病毒,我使用这么久没有发现什么。
不过多解释了。
解压密码为默认密码:3i3c.cn
火车头5.7快乐版链接: https://pan.baidu.com/s/1NyQM6c7W4Pn1io4ibsx9PA 密码: 6666
下载
wget https://raw.githubusercontent.com/littleplus/ZabbixAgentInstaller/master/Zabbix.sh
运行
bash Zabbix.sh <参数>
或者
chmod +x Zabbix.sh
./Zabbix.sh <参数>
参数
Zabbix.sh [-s <zabbix server ip(s)>] [-n <zabbix host name>]
目前用AWS Debian 8.0测试通过,Centos 6/7通过。
说到linux啊平时很少人接触,大部分人接触的都是图形操作系统。接下来教大家一个小技巧!实现用小技巧!远程连接服务器,挂载本地硬盘
第一步打开 运行

输入 mstsc


打开本地资源

打开详细信息

选上需要挂载的硬盘 完成!服务器上成功挂载本地硬盘!教程到此结束!

PlayTube 1.4.3,此系统支持FFMPEG视频转码,还可以采集油管YOUTUBE,功能很强大界面和YouTub很像,比较简洁
官方购买地址:https://codecanyon.net/item/playtube-the-ultimate-php-video-sharing-platform/20759294
location / {
  if (!-e $request_filename){
    rewrite ^/$ /index.php?link1=home;
  }
  if (!-e $request_filename){
    rewrite ^/aj/([^/.]+)/?$ /ajax.php?type=$1&first=$2;
    rewrite ^/aj/([^/.]+)/([^/.]+)/?$ /ajax.php?type=$1&first=$2;
    rewrite ^/aj/([^/.]+)/([^/.]+)/([^/.]+)/?$ /ajax.php?type=$1&first=$2&second=$3;
  }
  rewrite ^/@([^\/]+)(\/|)$ /index.php?link1=timeline&id=$1;
  if (!-e $request_filename){
    rewrite ^/([^\/]+)(\/|)$ /index.php?link1=$1;
  }}location /reset {
  rewrite ^/reset-password/([^\/]+)(\/|)$ /index.php?link1=reset-password&code=$1;}location /confirm {
  rewrite ^/confirm/(.*)/(.*)$ /index.php?link1=confirm&code=$1&email=$2;}location /api {
  rewrite ^/api/v(([0-9])([.][0-9]+))(\/|)$ /api.php?v=$1;}location /admin {
  rewrite ^/admin-cp$ /admincp.php;
  rewrite ^/admin-cp/(.*)$ /admincp.php?page=$1;}location /admin-cdn/ {
  alias /admin-panel/;}location /videos {
  rewrite ^/videos/category/(.*)/rss(\/|)$ /index.php?link1=videos&page=category&id=$1&feed=rss;
  rewrite ^/videos/category/(.*)$ /index.php?link1=videos&page=category&id=$1;
  rewrite ^/videos/(.*)/rss(\/|)$ /index.php?link1=videos&page=$1&feed=rss;
  rewrite ^/videos/(.*)$ /index.php?link1=videos&page=$1;}location /articles {
  rewrite ^/articles(\/|)$ /index.php?link1=articles;
  rewrite ^/articles/category/(\d+)(\/|)$ /index.php?link1=articles&category_id=$1;
  rewrite ^/articles/read/(.*)(\/|)$ /index.php?link1=read&id=$1;}location /edit {
  rewrite ^/edit-video/(.*)?$ /index.php?link1=edit-video&id=$1;}location /watch {
  rewrite ^/watch/([^\/]+)(\/|)?$ /index.php?link1=watch&id=$1;
  rewrite ^/watch/([^\/]+)/list/([^\/]+)(\/|)?$ /index.php?link1=watch&id=$1&list=$2;}location /embed {
  rewrite ^/embed/(.*)?$ /index.php?link1=embed&id=$1;}location /resend {
  rewrite ^/resend/(.*)/(.*)?$ /index.php?link1=resend&id=$1&u_id=$2;}location /redirect {
  rewrite ^/redirect/(.*)?$ /index.php?link1=redirect&id=$1;}location /settings {
  rewrite ^/settings/(.*)/(.*)$ /index.php?link1=settings&page=$1&user=$2;
  rewrite ^/settings/(.*)$ /index.php?link1=settings&page=$1;}location /terms {
  rewrite ^/terms/([^\/]+)(\/|)$ /index.php?link1=terms&type=$1;}location /go_pro {
  rewrite ^/go_pro(\/|)$ /index.php?link1=go_pro;}location /ads {
  rewrite ^/ads(\/|)$ /index.php?link1=ads;
  rewrite ^/ads/create(\/|)$ /index.php?link1=create_ads;
  rewrite ^/ads/edit/(\d+)(\/|)$ /index.php?link1=edit_ads&id=$1;}location /contact {
rewrite ^/contact-us(\/|)$ /index.php?link1=contact;}RewriteEngine On
RewriteCond %{REQUEST_FILENAME} !-f
RewriteCond %{REQUEST_FILENAME} !-d
RewriteRule ^$ index.php?link1=home [NC,QSA]
RewriteRule ^reset-password/([^\/]+)(\/|)$ index.php?link1=reset-password&code=$1 [NC,QSA]
RewriteRule ^confirm/(.*)/(.*)$ index.php?link1=confirm&code=$1&email=$2 [NC,QSA]
RewriteRule ^api/v(([0-9])([.][0-9]+))(\/|)$ api.php?v=$1 [QSA]
RewriteRule ^admin-cp$ admincp.php [NC,QSA]
RewriteRule ^admin-cp/(.*)$ admincp.php?page=$1 [NC,QSA]
RewriteRule ^admin-cdn/(.*)$ admin-panel/$1 [L]
RewriteRule ^videos/category/(.*)/rss(\/|)$ index.php?link1=videos&page=category&id=$1&feed=rss [NC,QSA]
RewriteRule ^videos/category/(.*)$ index.php?link1=videos&page=category&id=$1 [NC,QSA]
RewriteRule ^videos/(.*)/rss(\/|)$ index.php?link1=videos&page=$1&feed=rss [NC,QSA]
RewriteRule ^videos/(.*)$ index.php?link1=videos&page=$1 [NC,QSA]
RewriteRule ^articles(\/|)$ index.php?link1=articles [NC,QSA]
RewriteRule ^articles/category/(\d+)(\/|)$ index.php?link1=articles&category_id=$1 [NC,QSA]
RewriteRule ^articles/read/(.*)(\/|)$ index.php?link1=read&id=$1 [NC,QSA]
RewriteCond %{REQUEST_FILENAME} !-f
RewriteCond %{REQUEST_FILENAME} !-d
RewriteRule ^aj/([^/.]+)/?$ ajax.php?type=$1&first=$2 [L,QSA]
RewriteRule ^aj/([^/.]+)/([^/.]+)/?$ ajax.php?type=$1&first=$2 [L,QSA]
RewriteRule ^aj/([^/.]+)/([^/.]+)/([^/.]+)/?$ ajax.php?type=$1&first=$2&second=$3 [L,QSA]
RewriteRule ^edit-video/(.*)?$ index.php?link1=edit-video&id=$1 [L,QSA]
RewriteRule ^watch/([^\/]+)(\/|)?$ index.php?link1=watch&id=$1 [L,QSA]
RewriteRule ^watch/([^\/]+)/list/([^\/]+)(\/|)?$ index.php?link1=watch&id=$1&list=$2 [L,QSA]
RewriteRule ^embed/(.*)?$ index.php?link1=embed&id=$1 [L,QSA]
RewriteRule ^resend/(.*)/(.*)?$ index.php?link1=resend&id=$1&u_id=$2 [L,QSA]
RewriteRule ^redirect/(.*)?$ index.php?link1=redirect&id=$1 [L,QSA]
RewriteRule ^settings/(.*)/(.*)$ index.php?link1=settings&page=$1&user=$2 [NC,QSA]
RewriteRule ^settings/(.*)$ index.php?link1=settings&page=$1 [NC,QSA]
RewriteRule ^terms/([^\/]+)(\/|)$ index.php?link1=terms&type=$1 [QSA]
RewriteRule ^go_pro(\/|)$ index.php?link1=go_pro [QSA]
RewriteRule ^ads(\/|)$ index.php?link1=ads [QSA]
RewriteRule ^ads/create(\/|)$ index.php?link1=create_ads [QSA]
RewriteRule ^ads/edit/(\d+)(\/|)$ index.php?link1=edit_ads&id=$1 [QSA]
RewriteRule ^contact-us(\/|)$ index.php?link1=contact [QSA]
RewriteRule ^@([^\/]+)(\/|)$ index.php?link1=timeline&id=$1 [QSA]
RewriteRule ^messages/(.*)$ index.php?link1=messages&id=$1 [NC,QSA]
RewriteCond %{REQUEST_FILENAME} !-f
RewriteCond %{REQUEST_FILENAME} !-d
RewriteRule ^([^\/]+)(\/|)$ index.php?link1=$1 [QSA]配置好伪静态后,找到对应你PHP版本的设置,在“禁用函数”里面把shell_exec这个函数删掉
官方演示站:https://playtubescript.com/
链接: https://pan.baidu.com/s/16A1HfWGObGjypvI3AEev8g 密码: raan
给群晖nas配置免费的SSL证书Let's Encrypt 超级实用的教程
套件中心安装:git server
SSH登录到NAS服务器
1、获取代码
git clone https://github.com/Neilpang/acme.sh.git2、安装脚本
cd acme.sh
./acme.sh --install --force
3、进入目录:
cd ~/.acme.sh/4、设置变量:
export DP_Id="1234"
export DP_Key="sADDsdasdgdsf"
5、申请证书:
~/.acme.sh/acme.sh --issue --dns dns_dp -d hostloc.com -d *.hostloc.com6、备注,90天以后更新证书时的命令为:
./acme.sh --renew -d hostloc.com -d *.hostloc.com
在等待120秒之后,证书就已经申请下来了,下面接着在NAS中部署证书,上一步中的证书申请时都下载到了~/.acme.sh/mydomain.site/,在DSM的File Station中找到该目录,把私钥、证书、中间证书下载到PC本地,这三个文件分别是私钥:mydomain.site.key、证书:mydomain.site.cer、中间证书:ca.cer,然后在DSM的控制面板中找到安全性,在“证书”中新建证书或替换已有证书,之后选择导入正整数,然后在私钥、证书、中间证书的选项中分别选中刚刚下载的文件,确定之后DSM会重启应用程序门户来应用新的证书。
网上扒的,不过网上找的那个是CloudXNS解析的,这里是用Dnspod的,留个记录
本文作者:你爹临死前 非辱骂 [哈哈] 人家网名真是这个。
最新评论
还有个问题就是:如果没有了Redis Object Cache这个插件的支持,那么如何手动清理Redis产生的缓存文件呢,每次修改过网站模板或者一些设置文件后,不清理缓存的话还是无法搞清楚是否生效啊
感谢博主分享,以前一直是只能使用redis或memcached其中之一,今天看到博主的教程,切换到了Nginx openresty然后跟着教程操作完,检查总是显示bypass绕过或miss,不知道哪里不对,每一步都是跟博主教程一样的操作。博主有qq或微信吗,想请教下~
。。。。。。
错别字,重新提交一下问题-小白提问,我所有的操作和流程和教程完全一致,没有出现任何意外情况,直到群晖桌面生成图标,鼠标放上图标显示已启动,点击打开图标显示此站点连接不安全,然后我把浏览器安全级别降到最低,还是一样,请问大佬可能是哪里出问题了呢
小白提问,我所有的操作和流程和教程完全一致,没有出现任何意外情况,知道群晖桌面生成图标,鼠标放上图标现在已启动,点击打开显示此站点连接不安全,然后我把浏览器安全级别降到最低,还是一样,请问大佬可能是哪里出问题了呢。
这个办法好,找了半天都没找到能完整使用redis+memcached的办法,还是在这里找到了。 感谢博主的方法,试了一下,挺好的。但是我发现,套了cloudflare之后,即使不开页面规则(即不对网站进行全站缓存),F12查看网站依旧会发现cf cache命中,查看x-cache提示bypass绕过,那这个方法是不是只有cf没有缓存的时候才有效呢? 不过不管cf有没有作用,实际感受上,网站响应速度快了很多。
请问一下,重启之后缓存会被删除啊,这个怎么解决呢
没听懂链路聚合什么意思